Sleeve Valves Installation Mistakes That Cause Leaks
Introduction
In municipal water transmission and high-head industrial applications, the sleeve valve (often referred to as an axial flow valve or energy dissipation valve) is a critical asset. Designed to handle massive pressure drops and control flow with precision, these valves are often the last line of defense against cavitation damage and system over-pressurization. However, despite their robust design, they are notoriously sensitive to their physical environment. A significant percentage of premature failures are not due to manufacturing defects, but rather specific sleeve valves installation mistakes that cause leaks.
For consulting engineers and plant superintendents, the cost of a leaking sleeve valve extends far beyond the loss of treated water. In high-head applications, a leak across the seat can rapidly wire-draw, cutting through stainless steel components and rendering a capital-intensive asset useless within weeks. Furthermore, external leakage caused by body deformation or seal failure can flood valve vaults, damaging adjacent instrumentation and electrical actuators.
This technology is primarily utilized in reservoir inlets, turbine bypass systems, water treatment plant intakes, and pressure reducing stations where high energy dissipation is required. Unlike simple gate or butterfly valves, sleeve valves involve complex sliding mechanisms and strict tolerance requirements. This article provides a comprehensive engineering analysis of how to select, specify, and install these units to ensure zero-leakage performance and long-term reliability. We will dissect the root causes of failure, focusing specifically on how mechanical stresses, hydraulic oversight, and installation errors compromise the valve’s integrity.
How to Select and Specify to Prevent Leaks
Preventing leaks begins long before the contractor arrives on site. It starts at the specification desk. If the valve is not correctly matched to the hydraulic envelope, no amount of careful installation will prevent eventual failure. Engineers must rigorously define the following criteria to avoid sleeve valves installation mistakes that cause leaks indirectly through poor specification.
Duty Conditions & Operating Envelope
Sleeve valves are often selected for their ability to handle high pressure drops ($Delta P$). However, specifying a valve based solely on maximum flow and maximum pressure is a recipe for seat leakage.
- Continuous vs. Intermittent Modulation: Valves that hover near the “crack open” position (0-5% travel) are prone to high-velocity wire-drawing across the seat. If the application requires prolonged low-flow operation, a smaller bypass valve or a sleeve valve with a customized porting design (e.g., graduated V-ports) must be specified to move the operating point into a safer range.
- Cavitation Index (Sigma): Even if the valve body is robust, micro-jets from cavitation can pit the seating surface. Engineers must calculate the Sigma factor for the entire operating range. If the anticipated Sigma falls below the valve’s critical Sigma capability, remote air injection or a multi-stage trim design is mandatory to protect the seat integrity.
- Pressure Transients: Analyze the water hammer potential. A sleeve valve must be rated not just for static pressure but for surge pressures that can unseat seals or deform the sleeve mechanism.
Materials & Compatibility
Material mismatch is a subtle but deadly cause of leaks. The sliding action of the sleeve against the body requiring specific hardness differentials to prevent galling.
- Galling Prevention: The stationary cage and the sliding sleeve are often both stainless steel. To prevent galling (which leads to seizing and subsequent leakage), specify materials with a hardness differential of at least 50 Brinell. Common pairings include 304 SS body with a Nitronic 60 sleeve, or hard-chrome plating on the sliding surfaces.
- Elastomer Selection: For the primary seat, the choice between EPDM, Buna-N, and Polyurethane depends on the water chemistry (e.g., chloramines) and temperature. A common error is specifying standard Buna-N for systems with high chloramine residuals, leading to premature brittleness and seal failure.
- Seat Design: For zero-leakage requirements (drop-tight), a resilient soft seat is required. Metal-to-metal seats typically only achieve ANSI Class IV shutoff, which allows for some leakage. Be explicit in the specification regarding the required leakage class (e.g., ANSI/FCI 70-2 Class VI).
Hydraulics & Process Performance
The flow characteristics of a sleeve valve are generally linear, but the installed characteristic is modified by the system piping. High-velocity intake configurations can create asymmetric flow patterns entering the valve. This turbulence causes vibration, which accelerates wear on the dynamic seals. Ideally, specify a straight pipe run of 5-10 pipe diameters upstream of the valve to ensure uniform flow distribution around the sleeve.
Installation Environment & Constructability
Many sleeve valves installation mistakes that cause leaks stem from physically impossible installation scenarios designed by the engineer.
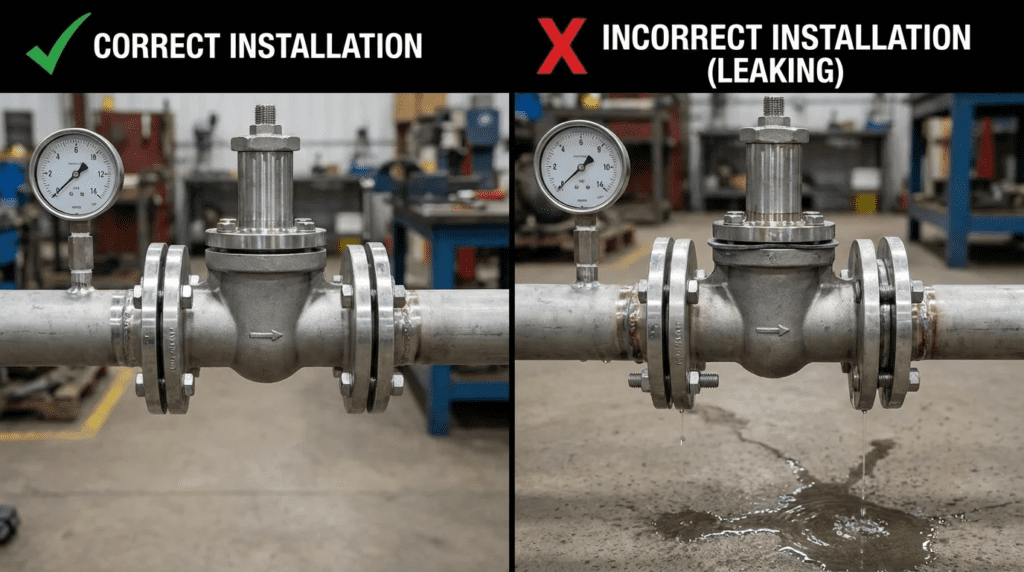
- Rigidity Requirements: Sleeve valves are sensitive to external pipe stresses. If the valve is installed in a location where the pipe is not adequately supported, the valve body may ovalize under the weight of the adjacent pipe or water load. This ovalization breaks the seal concentricity.
- Dismantling Joints: Always specify a dismantling joint (coupling) immediately downstream. This is not just for maintenance removal; it is critical during installation to prevent the contractor from forcing the valve between two fixed flanges, which induces stress on the body.
Reliability, Redundancy & Failure Modes
Consider the failure mode of the actuation system. If the valve fails open, will it drain the reservoir? If it fails closed, will it burst the upstream pipe? For leak prevention, the “Fail-Last” or “Fail-Closed” position must be mechanically secured. Hydraulic actuators are common on large sleeve valves; however, hydraulic fluid leaks can contaminate the water, and drift in hydraulic cylinders can prevent the sleeve from seating firmly. Mechanical locking systems or electric actuators with high holding torque are often preferred to ensure positive seating.
Controls & Automation Interfaces
Automation logic plays a surprisingly large role in physical leaks. “Hunting”—where the valve constantly makes micro-adjustments to find a setpoint—wears out the sliding seals rapidly. Engineers should specify a deadband in the SCADA logic (typically +/- 1% to 2%) to prevent unnecessary movement. Additionally, program a “seat seating” routine where the actuator applies full closing torque/thrust to compress the seal, rather than stopping exactly at 0% position feedback.
Maintainability, Safety & Access
Sleeve valves often require seal replacement every 5-10 years. Design the vault with an overhead hatch and lifting beam directly centered over the valve. If operators cannot easily access the valve, minor weep leaks will be ignored until they become catastrophic failures. Ensure there are isolation valves upstream and downstream to allow for safe dewatering during seal maintenance.
Lifecycle Cost Drivers
While sleeve valves have a higher CAPEX than butterfly or plug valves, their OPEX advantage lies in cavitation resistance. However, if specified incorrectly (e.g., wrong seat material), the OPEX balloons due to frequent seal replacements. A lifecycle cost analysis should assume one major overhaul (sleeve and seal replacement) every 10-15 years. Factoring in the cost of a bypass line allows the plant to continue operation during this maintenance, avoiding costly downtime.
Comparison of Valve Configurations and Seat Technologies
The following tables provide engineers with a comparative analysis of different energy dissipation technologies and seating materials. These comparisons focus on application fit, leakage potential, and the complexity of installation required to maintain a leak-free system.
Table 1: Energy Dissipation Valve Technologies
| Technology Type | Primary Features | Best-Fit Applications | Leakage & Installation Risks | Typical Maintenance |
|---|---|---|---|---|
| In-Line Sleeve Valve | Axial flow, sliding sleeve over ports, contained within pipe body. | Inline pressure reduction, transmission mains, flow control. | High Risk: Extremely sensitive to pipe stress/bending moments. Body deformation causes sleeve binding and seat leakage. Requires strict flange alignment. | Seal replacement requires removal from line or large access ports. |
| Submerged/Angle Sleeve Valve | Discharges into a stilling well or reservoir. 90-degree flow path. | Reservoir inlets, turbine bypass, discharge to atmosphere. | Moderate Risk: Less sensitive to downstream piping stress (as there is none). Vibration can loosen anchor bolts, causing base leaks. | Easier access to internal mechanism via top cover; often serviceable in place. |
| Plunger Valve (Needle Valve) | Piston moves axially to close against a seat ring. Streamlined body. | High-head isolation and control, pump control. | Low Risk: Rigid body design resists deformation better than sleeve valves. Metal seats are robust but may not be drop-tight (Class IV). | Internal guiding mechanisms require clean water to prevent scoring. |
| Multi-Jet / Fixed Cone Valve | Discharges a hollow cone of water to atmosphere. | Dam discharge, reservoir drain. | Moderate Risk: Spray containment issues (mist). Hood installation alignment is critical to prevent back-splash leaks. | External lubrication usually possible; rugged design. |
Table 2: Seat Material Application Fit Matrix
| Seat Material | Shutoff Class (ANSI/FCI 70-2) | Temperature Range | Chloramine Resistance | Debris Tolerance | Relative Cost |
|---|---|---|---|---|---|
| EPDM (Peroxide Cured) | Class VI (Bubble Tight) | -20°F to 250°F | Excellent | Good (Compressible) | Low |
| Buna-N (Nitrile) | Class VI (Bubble Tight) | -20°F to 180°F | Poor (Hardens/Cracks) | Good | Low |
| Polyurethane | Class VI (Bubble Tight) | -65°F to 175°F | Fair | Excellent (Abrasion Resistant) | Moderate |
| Stainless Steel (Metal-to-Metal) | Class IV (Allowable Leakage) | -400°F to 1000°F+ | Excellent | Poor (Scoring risks) | High |
| Bronze / Brass | Class IV (Allowable Leakage) | -325°F to 400°F | Good | Fair | Moderate |
Engineer & Operator Field Notes
This section details the practical realities of installing and maintaining sleeve valves. Drawing from field experiences, we highlight the operational nuances that often go unnoticed in the design office but are critical to preventing sleeve valves installation mistakes that cause leaks.
Commissioning & Acceptance Testing
The transition from construction to operation is where most leak issues are discovered—or unfortunately, created. Commissioning must include a rigorous Step-Test.
- Dry Stroking: Before admitting water, stroke the valve 100% open to closed. Monitor the actuator amperage or hydraulic pressure. A spike in current or pressure at a specific point in the travel indicates binding, likely caused by pipe-induced body deformation.
- Hydrostatic Seat Test: Do not rely on the factory test. Perform a field hydrostatic test at 1.5x working pressure (or as limited by the weakest system component). Visually inspect the downstream side (if possible via an inspection port) or monitor downstream pressure buildup to verify drop-tight shutoff.
- Vibration Baseline: Record vibration levels during the initial flow test. High vibration often loosens body bolts and flange connections over time, leading to external leakage. Establishing a baseline allows for predictive maintenance.
Common Specification Mistakes
Engineers often inadvertently specify conditions that make leakage inevitable:
- Oversizing: This is the most common error. An oversized valve operates constantly at 5-10% open. In this range, the gap between the sleeve and seat is minimal, creating high-velocity jets that erode the seat (wire-drawing). Always size for the minimum controllable flow, not just the maximum pipe capacity.
- Ignoring Debris: Sleeve valves have tight tolerances. If the spec does not require an upstream strainer (typically 3/8″ to 1/2″ perforation), construction debris (welding slag, rocks) will get trapped between the sliding sleeve and the cage. This prevents full closure, resulting in a permanent leak.
- Ambiguous Flange Tolerances: Standard piping specs allow for some misalignment. Sleeve valves do not. Specifications must call for “flat-face” and “parallel” alignment stricter than general piping standards (e.g., parallelism within 1/32″).
O&M Burden & Strategy
To maintain a leak-free state, the maintenance strategy must be proactive.
- Exercise Cycle: Valves that sit static for months will accumulate scale and biological growth on the sliding surfaces. When finally moved, this scale tears the O-ring seals. Program a monthly “exercise” routine in SCADA to move the valve +/- 20% to wipe the surfaces clean.
- Lubrication: If the valve design includes external grease fittings for the operating mechanism, ensure the grease is water-resistant and compatible with potable water (NSF-61) if there is any risk of contact.
- Spare Parts: Keep a complete “Soft Goods Kit” (all elastomers, O-rings, and seat seals) on the shelf. Lead times for these proprietary parts can be weeks or months.
Troubleshooting Guide
- Symptom: Leakage through the valve when closed.
- Root Cause: Debris on seat, worn elastomer, or actuator limit switch set incorrectly.
- Action: Flush valve (fully open/close). Check actuator torque seating. If persistent, internal inspection is required.
- Symptom: External leakage at body joints.
- Root Cause: O-ring failure due to pressure surge or body bolt relaxation.
- Action: Depressurize and replace body seals. Torque bolts to manufacturer spec in a star pattern.
- Symptom: Valve sticks / Jerky movement (Stiction).
- Root Cause: Galling or body deformation from pipe stress.
- Action: Loosen downstream dismantling joint to relieve stress. If movement smooths out, piping alignment is the culprit.
Design Details: Sizing and Installation Logic
Correct sizing and physical installation design are the mathematical and mechanical safeguards against leaks. This section outlines the methodology engineers should employ.
Sizing Logic & Methodology
Sizing a sleeve valve is not merely about matching the line size. It involves matching the valve’s Cv (flow coefficient) to the system requirements.
- Determine Cv Range: Calculate required Cv for Minimum, Average, and Maximum flow conditions.
Cv = Q / √(ΔP / SG)
Where Q = Flow (GPM), ΔP = Pressure Drop (psi), SG = Specific Gravity (1.0 for water). - Check Velocity: Ensure port velocity does not exceed manufacturer recommendations (typically 30-45 ft/s for intermittent, 20-30 ft/s for continuous). Excessive velocity causes vibration, leading to joint leaks.
- Verify % Open: Select a valve size where the Average flow occurs between 30% and 70% open. Avoid sizing where normal operation is <15%.
- Cavitation Analysis: Calculate the Sigma value: σ = (P_downstream – P_vapor) / (P_upstream – P_downstream). Compare this against the valve’s tested cavitation breakdown point. If σ is low, the valve will cavitate, vibrate, and eventually leak.
Specification Checklist for Installation
To avoid sleeve valves installation mistakes that cause leaks, add these specific line items to your Division 40 or Division 43 specifications:
- Manufacturer’s Representative Requirement: “The valve manufacturer’s factory-trained representative shall be present on-site to inspect the piping alignment prior to bolt-up and during the initial torque sequence.”
- Dismantling Joint: “A restrained dismantling joint shall be installed on the downstream flange of the sleeve valve to facilitate removal and prevent transfer of pipe strain to the valve body.”
- Foundation: “The valve shall be supported by a concrete pedestal or structural steel support designed to bear the full weight of the valve plus water, independent of the piping.”
- Flange Parallelism: “Mating flanges shall be parallel within 0.030 inches before bolts are inserted. Springing the pipe to align flanges is strictly prohibited.”
Standards & Compliance
While there is no specific AWWA standard dedicated solely to Sleeve Valves (unlike C504 for Butterfly or C509/515 for Gate), the following standards apply to components and testing:
- AWWA C512: Air-Release, Air-Vacuum, and Vacuum-Breaking Valves (often referenced for air control associated with sleeve valves).
- AWWA C550: Protective Epoxy Interior Coatings (critical for preventing corrosion that leads to leaks).
- ASME B16.5 / AWWA C207: Flange dimensions and pressure ratings.
- NSF/ANSI 61: Drinking Water System Components – Health Effects (mandatory for elastomers and lubricants).
Frequently Asked Questions
What are the most common sleeve valves installation mistakes that cause leaks?
The most common mistake is forcing the valve into a piping gap that is not perfectly aligned or parallel. This “springing” of the pipe transfers stress to the valve body, causing it to deform slightly (ovalize). This deformation prevents the internal sliding sleeve from sealing uniformly against the seat, resulting in internal leakage. Another common error is failing to flush the line before operation, allowing construction debris to damage the soft seat.
How does a sleeve valve differ from a plunger valve?
While both are axial flow control valves, a plunger valve uses a piston that moves axially to close against a seat ring, often with a streamlined body. A sleeve valve typically uses a cylindrical sleeve that slides over ported openings. Generally, plunger valves are more rigid and capable of tighter shutoff in high-pressure isolation duties, while sleeve valves are excellent for energy dissipation and discharging to atmosphere or submerged environments.
Can a sleeve valve be installed vertically?
Yes, many sleeve valves are designed for vertical installation, particularly in submerged applications or reservoir inlets. However, engineers must verify the actuator orientation and support structure. Vertical installation requires careful consideration of the actuator’s weight and the potential for debris to settle at the bottom of the valve (on the seat), which can prevent proper sealing. Always consult the manufacturer for vertical orientation specificities.
What is the typical lifespan of a sleeve valve seat?
The lifespan of the soft seat (elastomer) depends heavily on usage and water quality. In clean water applications with proper modulation, seats can last 7-10 years. In applications with high grit content, frequent cycling, or cavitation presence, seats may need replacement every 3-5 years. Metal components typically last 20-30 years if cavitation is controlled.
Why is a dismantling joint required for sleeve valve installation?
A dismantling joint allows for the adjustment of the longitudinal space between flanges. This ensures that the valve can be inserted and bolted up without applying tensile or compressive stress to the valve body. It also provides the necessary clearance to remove the valve for maintenance without cutting the pipe. Omitting this component is a primary cause of installation-induced stress leaks.
How do I calculate the correct torque for sleeve valve flange bolts?
Torque specifications are derived from the type of gasket used, the bolt material/grade, and the flange rating (e.g., Class 150 vs Class 300). Engineers should not guess; they must follow the gasket manufacturer’s tables for required compression. Crucially, a “star” or “cross” torquing pattern must be used in multiple passes (30%, 60%, 100% torque) to ensure even loading and prevent warping the valve flange.
Conclusion
Key Takeaways for Engineers
- Stress Kills Seals: The #1 cause of leaks is body deformation due to pipe stress. Always use dismantling joints and strict alignment tolerances.
- Material Matters: Specify seat materials (EPDM, Polyurethane) based on chemical resistance (Chloramines) and abrasion resistance.
- Size for Velocity: Avoid oversizing. Valves operating consistently below 10% open will suffer from seat wire-drawing.
- Protect the Valve: Install upstream strainers to prevent debris from lodging in the sliding mechanism.
- Commission Correctly: Perform dry stroke tests to detect binding before introducing water pressure.
The successful deployment of sleeve valves in water and wastewater systems requires a departure from standard “drop-in” valve mentalities. These are precision instruments designed for extreme hydraulic duties, and they demand a corresponding level of precision in specification and installation. By recognizing that sleeve valves installation mistakes that cause leaks are often structural and procedural rather than product defects, engineers can mitigate risks significantly.
A holistic approach—combining correct sizing calculations, material compatibility analysis, rigid installation specifications, and proactive maintenance strategies—ensures that these capital-intensive assets perform reliably for decades. When in doubt, involve the manufacturer early in the design phase to review piping layouts and support structures. The cost of upfront engineering rigor is negligible compared to the operational nightmare of a leaking high-pressure control valve.